Posted on

Smart Watches are a Brilliant Productivity Tool, Not Just for Nerds

Vintage 1900 fashion man with beard and glasses. Sitting in old wooden reading room. Looking at pocket watch.Watches have been out of vogue for a long time now, which to me is just absurd. It’s just unbelievable the number of people who I have encountered that thought it made more sense to pull a brick out of your pocket to check the time rather than glancing at your wrist. It’s as if for a decade or so, we went back to the age of pocket watches.

PMagneto Chibiersonally, I’ve never been one to follow the herd. I never really stopped wearing a watch until a couple years ago when I had three digital watches in a row fail on me within a couple months of ownership. They never even got wet aside from hand washing. Maybe I became one of those minor magneto people.

Anyway, about a year ago, I decided I wanted a smart watch – the one i had my eye on at the time was the Pebble. It had thepebble 
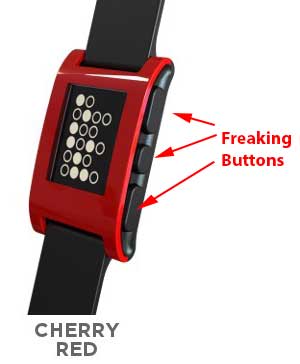
lowest price point, yet it was very responsive – much more so than the Meta watch, and it did the main thing most people want a smart watch for – it showed notifications – including caller ID. It also has an accelerometer, so you can use it as a pedometer or a sleep monitor. Probably the biggest selling point is the battery life – you could get a whole week out of it before having to charge it.

The downside, of course is that it’s completely monochrome with no touchscreen and a bunch of buttons – granted this is perhaps the main reason the battery life is so good. It’s just an extremely basic smart watch. The functionality is very limited, but it excels within that niche, nonetheless.

Samsung Gear 2
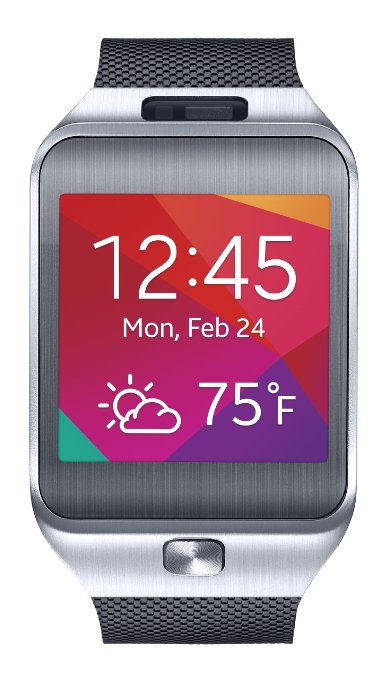
On the other end of the spectrum is the Samsung Gear 2, with a 1.63-inch AMOLED touchscreen, a 720p camera for shooting wrist video, or just being a stealthy creeper, an IR-blaster for controlling your TV so you don’t have to get up and find the remote, and music control… oh, and did I mention you can make and receive calls directly from the watch? This, of course isn’t very practical in a crowded room – aside from the ability to expediently reject unwanted calls, but when you’re driving, it’s amazing. The call quality exceeds that of my Galaxy S4. Most people I talk to don’t even know they’re on speakerphone until I tell them (and I’ve been asking).

Personally, I have the Samsung Gear 2 Neo – the key difference with the Neo is the absence of the camera. Oh, and it costs about $100 less. It’s pretty much the same device otherwise. The problem with smart watches is that there’s no real standard, so there’s not a single smart watch marketplace – each line has its own, and the selection isn’t that great. This just means there’s a lot of room for growth, and a whole new avenue for developers to make their mark.

Another notable feature, which comes standard with the Gear 2, is a “find my phone” app. You launch the app on your watch, and your phone starts ringing. It’s a fantastic feature for anyone who regularly misplaces their phone or drops it between the seat and console in your car. Also, if you walk outside of the bluetooth range (about 30 feet), your watch will vibrate letting you know that bluetooth has been disconnected. This has prevented me from leaving my phone in my car a few times already.

The watch does have a heart-rate sensor, but it’s complete garbage. You have to go to the heartrate app, and you have to position the watch just perfectly for a full minute to get a reading, and 9 times out of ten, it will tell you that you did it wrong. It’s pretty much impossible to get a reliable heartrate monitor without a chest strap. You can get a bluetooth chest strap that can interface with a number of smartphone apps for about $50.

The Samsung Gear 2 accepts voice commands using S Voice, which is stellar for making calls, but not so great if you want navigation, though you can ask for random facts – in case you want to know what the fastest car in the world is without pulling your phone out. Smart watches equipped with Google Gear can use the full scope of Google Now, including navigation.

Moto 360
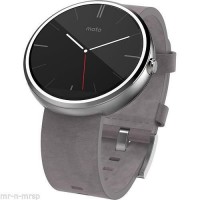
The latest on the market is the Moto 360. It doesn’t quite have the hardware that the Samsung Gear has – there’s no camera or IR blaster, but it oozes with style. It looks like a standard watch, for the most part, and charges using a contact-less charger. I guess that’s convenient or something – I mean, you still have to take it off your wrist. Where it really shines, though is its full use of Google Now, meaning the voice command capabilities are pretty kickass.

Posted on

Why Your Demo Site Sucks, and What to Do About It

Over the past few months, I’ve been running into a problem with the WooCommerce UPS Toolbox. Because it’s such a specialized product, many prospective buyers naturally want to try it out for themselves to make sure it’s a good fit for their needs. While I’ve had a demo site up for all of that time, it’s a bit complicated.

Because it requires UPS account credentials, and I don’t really want to broadcast my own account info, and I definitely don’t want to expose a potential buyer’s account info, so that means I’ve been wiping the previous user’s account info and creating a new user each time someone asks for a demo.

Additionally, I’m sure it’s a bit of a pain to have to send someone a message requesting a demo, so that probably means for every person that contacts me asking for a demo, there are probably 5-10 others that want a demo, but don’t want to go through the trouble of sending a message.

The Spark

A few weeks back, it occurred to me that I needed to find a better way to set up a demo site.

For starters, the user needed to be automatically logged in after clicking the button/link to view the demo.

Next, I needed to be able to restrict access for the demo user so it had the access it needed, but no more. In addition to  preventing unwanted changes to the site, this would have the added benefit of removing distractions to anyone using the demo.

Third, I needed to be able to dynamically divert new users to different sites so multiple users wouldn’t get logged into the same site.

User Experience – Who is Doing it Right

These requirements are primarily just for the sake of managing the demo site(s) and doesn’t take much into account the actual user experience (as well as the goal of funneling demos into sales). One good example of who is doing this part right is Envato – both ThemeForest and CodeCanyon have a “Live Preview button for every product, which opens a new window and contains the actual demo site within an iframe and contains a “Buy Item” button which returns you to the product page.

While I think that adding the item to the cart would be a better option here, unless you’re selling a simple item (with no variations) this could overcomplicate the UI a bit.

Demo Bar

The Solution

I had been considering building a solution that handles all this, but frankly, this would be a huge undertaking. There are lots of moving pieces, and a lot of things to consider when building something like this – especially if you intend to share it with the world. I was glad when I stumbled across NinjaDemo a week ago.

NinjaDemo is a fairly new product, so it doesn’t open the demo in a new window or display a “buy item” button in the header(yet), but what it does do is very elegantly allow you to set up demo sites for any number of products, and have each of those be replicated numerous times without needing to clean anything up. After a preset amount of time, each replicated demo site is simply deleted, and new ones are always copied from your the original (which can only be altered by you).

You also have a fairly finely grained control of access for the users that will be accessing this site, so besides choosing what user will be used to login (so you can create a user with a basic role) you can also restrict all the admin menus that they will have access to.

Setup Challenges

As with any amazing product, there are some difficulties with setting it up. The main requirement is that your main site – the one you’re linking the demos from needs to be multisite enabled – and not just any kind, but it absolutely has to be a subdirectory multisite.

The problem with that is that if your site is more than a month or so old, WordPress won’t let you choose subdirectory

“You cannot choose Sub-directory Install (for a path-based network) if your existing WordPress installation has been set up for more than a month, due to issues with existing permalinks. (This problem will be fixed in a future version.)” codex link

There is a workaround for this, though. There’s a code snippet that needs to go somewhere. I’ve heard people say to put it in your active theme’s functions.php, but that just seems like a bad idea for a number of reasons. I think a better solution is to put it in your mu-plugins directory.

mu-plugins are very different from your typical plugins. They don’t require the standard plugin header that normal plugins have and they don’t need to be enabled, as the “mu” part stands for “must use” as in “always on”. So, basically, all you need to do is add a php file to the /wp-content/mu-plugins folder (create the folder if it doesn’t exist) and add this to the file:

[code]

<?php add_filter( ‘allow_subdirectory_install’,
create_function( ”, ‘return true;’ )
); ?>

[/code]

From there, you’ll be able to enable subdirectory multisite, and it’s pretty much cake from there on out. Set up a new subsite for each demo you want to be available, set the options for each, and then use the shortcode where you want the buttons to be (make sure to set the site_id for the respective demo site).

CREATE A DEMO SITE NOW

Posted on

Experiments in Conversion Rate Optimization

People talk a lot about SEO, and a lot of people think the goal is to make sure their website shows up on the first page in Google for some general keyword as though somehow, that’s going to result in a flood of sales, but that couldn’t be further from the truth.

Don’t get me wrong, search engine ranking is great, and if you can rank well for specific keywords, that’s going to be a feather in your cap; however, that’s just the start of a long journey towards the sale. You have to be sure to craft your listing so that the title is descriptive and the snippet description is compelling. Once they’re on your site, it’s a matter of engaging them – giving them enough options to keep them interested without them getting lost in the forest.

There’s plenty of other on-page SEO tips that go a long way towards conversion optimization, but the biggest items are removing barriers to complete the sale and suggesting additional last-minute purchases just before checkout.

In my case, I had been requiring registration to checkout as well as requiring a shipping address, even though I only sell digital products. While it’s cool to see my stuff being purchased by people from various other countries, I really don’t need to know where my customers live – I just want them to be able to make a purchase as swiftly and conveniently as possible.

After seeing some suggestions regarding the shipping address, I created the WooCommerce Disable Shipping for Virtual Products plugin. It’s not a very clever name, I know, but it does what it says. If there are people out there that sell both physical and digital products and want to be able to not require a shipping address for customers only purchasing the digital products, then this plugin will do just that. If any non-virtual products are in the cart, the billing and/or shipping fields will be required as normal, otherwise, only an email address is required (gotta have something to use to send the goods, eh?)

I just installed the plugin on my site to test it out a couple days ago, and my sales have increased by more than 10 times! Granted, that’s just over the course of a couple days, so it’s not really a large enough sample size to draw any conclusions on the level of effectiveness just yet, but I’m certain the plugin was a significant factor.

If you sell virtual products – either services or digital products, I urge you you give this plugin a try!

Posted on

How to Choose the best Web Hosting Company

If you’re looking to get a website for your company, once you’ve decided on the domain name, the first decision you need to make is the where to host it. Your hosting can make or break your site. Your website is your representation on the web. If it’s buggy or slow, people won’t be interested in browsing it and learning about your company. There are a number of factors to make sure you make the right choice, and there’s no one answer for which company is the best for web hosting.

Unlimited Everything

There are a lot of companies out there that advertise unlimited everything. Don’t be fooled by this. There’s no such thing as unlimited everything. Server resources are always limited – this just means that you’re not protected from overuse by other customers. The problem with unlimited everything setups is that under most circumstances, your site is on the same server as dozens of other accounts, each of which might even be hosting a few sites. If enough of them spike in traffic or server load (because none of them are capped) all the sites on that server will suffer from poor performance.

That doesn’t necessarily mean all web hosts that offer unlimited bandwidth and/or space are bad, but just don’t think they’re automatically a better value than another company that limits bandwidth or space.

It can be frustrating when you look at some web hosting companies and see how constrained some of their limitations are, but understand that you get what you pay for. The key is to make sure you’re not paying for more than you get or more than you need.

Traffic

If you currently have no web presence, this might not be as big of a concern, since you might not have a huge amount of traffic out of the gate, unless you already have a big enough market and demand. If you have or anticipate thousands or tens of thousands of hits per day, then that will narrow your choices a bit. Depending on just how much traffic you get, you may need to go with a VPS (virtual private server) or even a Dedicated Server. The difference between the two is with a dedicated server, you literally have full control of a physical server. With a virtual private server, this is one of multiple virtualized servers running on a single physical server. Both of these options typically give you access to a much greater level of server resources, reducing the likelihood that a surge in site traffic will result in your site loading slowly. The downside to both of these options is that they don’t always come fully managed by the hosting company, so there can sometimes be security issues that would normally be addressed with a shared hosting plan. So, if you can, your best bet is usually going to be with a higher-end shared hosting plan rather than a virtual or dedicated server – unless you just have a lot of technical knowledge on how to secure and optimize your server. Regardless, it’s always a good idea to look at a hosting company that has bigger plans in case you need to scale up down the road.

Storage / Bandwidth

This isn’t an issue for most sites, but if you’re a photographer or someone else who needs to display high-res images on your site, the amount of storage space you require is going to be a limiting factor. There are ways to offset this in many cases. Primarily, the solution I often recommend is leveraging a CDN (content delivery network) for your images. What’s a CDN, you ask? A CDN typically has thousands of high-performance, high-bandwidth servers scattered around the globe whose sole purpose is to serve up files. When you upload your files to the service, they get distributed to all the servers, and when customers visit your site, the files load off the server closest to them, ensuring that your site always loads quickly.

If you dont have 20-30GB of images, but you still do have an image-heavy site, you’ll probably still benefit from the use of a CDN. In either case, you usually don’t need to upload the files to the CDN service – you can simply have the CDN pull them off your server – if you have more than your hosting account will handle, then that may be an exception to this.

Support

There are some web hosting companies out there that offer good technical specs, but have absolutely horrid support. Make sure you go with a company that has stellar support

So, what are the best options?

If your traffic is less than 1k hits per day, and your site isn’t incredibly large (in terms of number of pages) then a good, cost-effective yet high-performance option is inmotion hosting. Their servers and network infrastructure are tightly managed to ensure high availability and performance of your website.

If you have a medium level of traffic ranging in a few thousands of hits per day, a better option would be to go with a small orange. Their pricing does start a bit lower than inmotion, but their business hosting is a bit higher, and they also offer more high-end solutions than that of inmotion.  They offer 24×7 technical support, and ultra-fast servers to make sure your site loads blazingly fast.

If you want full-service hosting that will take anything you throw at it and never have to worry about optimizing your site’s performance, go with WPEngine. They have amazing customer support, automated daily backups of your site, and they even handle all your WordPress updates without you having to lift a finger.

WP Engine

Posted on

AJAX Made Simple with the WordPress JSON API Plugin

Implementing AJAX in WordPress can provide a lot of flexibility. In addition to the obvious benefits of AJAX form submissions, you can load specific details based on a user’s interaction with the site, making you site more… wait for it… interactive. If nothing else, you can load a lot less data on the initial page load by loading certain pieces asynchronously, helping you to significantly decrease your initial load time.

Implementing AJAX in WordPress through the stock methods is not particularly difficult, but it can be rather tedious. First, you need to create a php function that will return the results you want to load, then you have to hook it into the wp_ajax_no_priv_(action). Then, you have to create a javascript file, enqueue it, and be sure to use wp_localize_script to pass it the location of admin_ajax.php, and be sure to formulate your ajax call to use the appropriate action name.  After that, you need to go back to your javascript and be sure to use the ajax response appropriately.

When you need to save something in the database, this is probably the best way to handle things. The admin_ajax.php file has safeguards to ensure that someone else doesn’t hijack it and use it to insert malicious or spammy data in your database. If you only need to display content excerpts, for example, you can leverage the JSON API and do everything in jQuery. The JSON API is a REST web service, so any parameters can be passed entirely through the url structure, and, as the name implies, the results are returned in JSON format, which, as you may have guessed, is very easy to work with in Javascript.

For starters, we need to download and install the JSON API plugin. Now, let’s take a look at the settings – as you can see, there are a few controllers that can be enabled or disabled as needed. By default, the core controller is enabled, which provides read-access for posts, pages, categories, and tags.

JSON Controllers

So, let’s start with the get_posts method – /api/get_posts/ returns the following:

JSON Results

As you can see, there’s quite a lot of useful data here – beyond the title, content and excerpt, we also have the categories, the tags, and the associated images listed – in every size.

There’s not much here in the way of filtering, and there’s nothing out of the box for listing custom post types or taxonomies; however, you can specify an individual post type by post id or by slug. What’s even better is that it’s completely extensible. You can create custom controllers to do just about anything you want with super complex queries if your heart so desires. This is, perhaps, the best documented plugin in the WordPress plugin repository. The “Other Notes” section alone is 18 pages long.

With get_posts, we can pass count (posts per page), the page number, and the post_type as parameters. With get_post, we can pass the post_id or post_slug and (optionally) the post_type. This makes it ideal for displaying data related to WooCommerce products, for example. Now, let’s try accessing the api via jQuery. In this instance, I’m looking at the Purchase Order Payment Gateway product using:

[code]jQuery.getJSON(‘/api/get_post/?post_type=product&post_slug=woocommerce-purchase-order-payment-gateway’)[/code]

JSON response object


As you can see, there’s quite a bit to work with here – all nice and organized for us. If I want to get the excerpt, I can just use resp.excerpt. For the main thumbnail image, I can use resp.thumbnail. We can traverse the object by expanding the different elements. So, if you wanted to check out the thumbnail image sizes, you’d expand thumbnail_images

JSON Thumbnails


Posted on Leave a comment

Caching Dynamic CSS in WordPress with URL Rewriting

Lately, I’ve been focusing a lot on improving website performance – getting sites to load as quickly as possible – sometimes in less than a second. W3 Total Cache handles just about every aspect of website performance. Page caching alone is a huge benefit to website load time on the first visit, and when you optimize browser caching for static resources, that makes navigating to other pages even faster. Add a CDN, and your static resources such as images, css files, and js files get downloaded at blazing speeds and take the load off your web server. Minification and file combining can help, but this can be tedious if you need to do it manually.

The Problem

One problem I have come across, though is some plugins and even themes that use dynamic css referenced as a separate file using a query string. A few culprits that use this method are the jQuery Accordion Menu Widget, the jQuery Mega Menu Widget, and even the latest version of PageLines.

Dynamic CSS?

Dynamic CSS does have some advantages – for one, it allows for a more user-friendly interface to configure various styling options without having to include lots of different css files for each option and as a result, can be a lot easier to maintain. The problem is that since the stylesheet doesn’t actually exist (it’s just the output of a php file based on a template css file), it never gets cached, so every time someone visits your site, it has to be generated and downloaded again. This means your visitors are going to be waiting longer for your pages to load. Not to mention, if you’re using a CDN, it won’t get processed properly.

So, how do we fix this?

One option is to just view the source and copy the stylesheet path including the variables into your address bar, copy the generated css, paste it into your theme’s stylesheet (or a separate one, if you like), and either set the widget to not use a skin (you’ll also have to copy the image resources into the proper location on your theme) or comment out the section where the dynamic php is referenced in the plugin/theme. I haven’t looked at how this is handled in Pagelines, but in the jQuery Mega Menu plugin, the stylesheet is simply echoed, so you can’t just dequeue and re-enqueue outside of the plugin, unfortunately.

URL Rewriting

We can handle this with a bit of URL rewriting. The first step is to get Apache to point our fancy url to the actual URL. The method used is one I found in an article  on Terminally Incherent. Of course, I had to modify it a tad to get it to work for my purposes, but this is was the end result:

[code]

<IfModule mod_rewrite.c>
Options +FollowSymlinks
RewriteEngine on
RewriteBase /wp-content/plugins/jquery-mega-menu

RewriteRule ^([^/]+)-([^/]+)\.css$ skin.php?widget_id=$1&skin=$2 [NC]
</ifmodule>

[/code]

This will actually work for both jQuery Accordion Menu Widget and jQuery Mega Menu Widget, as they both use the same filename and query string (of course, you’ll need to change the rewrite base accordingly). This file goes inside the specific plugin folder, not the root or your site.

This will let us reference the dynamic stylesheet with a url that looks like an actual file. For example, if I’m using widget_id 2 with the “white” skin, the original url would have been:

http://somesite.com/wp-content/plugins/jquery-mega-menu/skin.php?widget_id=2&skin=white

but now, we can use:

http://somesite.com/wp-content/plugins/jquery-mega-menu/2-white.css

The second half is actually making the plugin reference the stylesheet using the fancy url, and we’ll need to modify the plugin to make this happen.

This file doesn’t actually exist, but since it looks like a file and doesn’t have any query strings, it can be cached, and it can also be mirrored by your CDN.

[code language=”php”]

change

.”/skin.php?widget_id=”.$key.”&amp;skin=”.strtolower($skin).”\”

to

.”/”.$key.”-“.strtolower($skin).”.css\”

[/code]

And that’s it! your css will now be cached and/or mirrored by your CDN, which should cut at least 200ms off your load time.

The Proof

Before:


After:


Posted on Leave a comment

Reverting WordPress Plugin Updates

Sometimes, while an update for a particular plugin might be rock solid, it might hinder the functionality of another plugin, so you end up having to roll that plugin back till you can fix the problem.

That means you have to either download the previous version of that plugin, extract it, and then upload it via ftp, which could take a really long time.

You could also upload the zip, and then use the web-based file manager to extract the file to overwrite the plugin update if your web host has that functionality, which would save some time, but it’s a bit more work.

What if, prior to any update, a snapshot of your db was taken (optional) and a copy of the current version of whatever you were updating was backed up on the server – all automatically. That way if the update created a problem, you could just “rollback” or “un-update”, and the update would be quickly reversed.

Maybe this is just me wanting to be lazy, but I think this would be a huge benefit to a lot of people, and I haven’t been able to find anything that does that. I’m pretty sure all the individual steps are doable, and I’ve seen several posts for at least the last 3 years, and the answer is always “no, you have to do it manually”

Now, it may not be feasible to automate restoring from a database backup, but in most cases, you only need to replace the plugin files to restore the functionality of the previous version.

There may be a solution for this that I haven’t come across, and there may be a reason this shouldn’t be done, but I think I’m going to try creating this solution. Any feedback is welcome.


Posted on Leave a comment

How to Speed up WordPress

After you’ve improved to you site’s keyword density, set up all the proper meta tags, configured your robots.txt, and generated and submitted your sitemap.xml, to ensure you site rank is as high as possible, you’ll want to optimize your site speed. The general recommendation is to keep your site’s load time under 2 seconds.

Aside from the obvious effect of a slow site to visitors, Google has been factoring site load time into the Page Rank formula since April 2010. There are many factors that can contribute to load time, and the steps you’ll need to take will be dependent on those factors.

There are a number of different methods you can take to analyze your site’s load time. The best place to start is a site speed test site such as Pingdom or WebPageTest. WebPageTest is a bit more detailed and comprehensive, and Pingdom is a bit simpler to understand. Also WebPageTest takes about 5 times longer to run. Both will display a waterfall style horizontal graph displaying the load time of each item.

Pingdom graph colors

Most of your load time will most likely fall under connect and/or receive. We’ll get to what to do about those a bit later. After you’ve reviewed the graph, check out the Performance Grade for Pingdom or Performance Review for WebPageTest. These will give you actionable recommendations for ways to reduce your load time. Most of the recommendations will likely involve caching, so lets start there.

Caching Types

There are a number of types of caching, and while the W3 Total Cache WordPress plugin handles all of them, it can be complicated to configure, and some options may not work depending on your hosting plan, so I’d like to review the types of caching.


Page Caching

Dynamic Content Management Systems such as WordPress can be immensely versatile and easy to manage, but they can tend to put a greater load on a web server than necessary. For static pages, and even for most posts, it makes more sense to write the content for each page/post to static files and serve them up when each page is visited rather than to process all the php and sql queries each time. Each file is refreshed whenever the page/post is updated, so the static files won’t contain outdated content.

While, as previously mentioned, the W3 Total Cache plugin will handle page caching, it may not perform page caching well in all hosting environments. In these circumstances, I find that Quick Cache also works well for page caching and doesn’t conflict with W3 Total Cache (as long as you have page caching disabled).

Minify

While not technically caching, it can certainly be a dramatic benefit in conjunction with caching. Minification is simply removing unnecessary white space from text files like HTML (or HTML rendered from PHP) Javascript and CSS. While it’s usually safe to minify HTML and inline JS and CSS, dynamically minifying external JS and CSS can result in a failure for those files to load properly, so it’s usually best to manually minify those files using a tool such as YUI Compressor.

Browser Caching

This greatly helps to offset the load time of static files as well as the overall load time of the site when revisiting the same page, or visiting additional pages on the same site. In addition to the obvious benefits of  configuring headers to promote browser caching, if a Proxy Caching Server exists on a user’s network, its possible that the site load time will be lessened even on the user’s first visit to the site. If you update your CSS or JS files frequently, it’s important to append a query string to these static resources to ensure that the latest version of these files are loaded.

 Further Analysis

There may be times when all the above methods still fail to bring your site’s load time down to a reasonable time. Enter the P3 (Plugin Performance Profiler) Plugin. This plugin will analyze the impact that each plugin has on your site’s load time as well as the impact of your theme. It’s possible that a single plugin may be the culprit.

Moving Javascript to Footer

When Javascript loads in the header, it unnecessarily increases the load time. It’s a fairly simple task to force javascript to load in the footer. If you’re enqueue-ing you’re own scripts, you can simply change this:

wp_enqueue_script(
		'custom-script',
		get_template_directory_uri() . '/js/custom_script.js',
		array('jquery')
	);
to this
wp_enqueue_script(
		'custom-script',
		get_template_directory_uri() . '/js/custom_script.js',
		array('jquery'), false, true
	);
If you're using several plugins that load javascript, you can use the Javascript to Footer plugin.

Image Optimization

Ensuring your image file sizes are as low as possible can improve your site’s load time by up to 10% without degrading image quality. There are many tools available for lossless image optimization, but probably the most reliable and comprehensive is Yahoo’s Smush.it. Yes, there is a plugin for that WP Smush.it will run images through Smush.it as you upload them to your site, or you can select to process several in bulk from your media library. This can be incredibly slow, and if you have dozens of images to process at once, your server may timeout if attempting to process too many at once. If you’d rather optimize dozens of them before uploading them, there is a command line utility that uses the Smush.It web service.